Use SuperScan to analyze deleted and severely damaged volumes
Use SuperScan when trying to recover a partition or volume that you know has been deleted or damaged. In other words, if you do not see a logical drive listed under a device node in the Local System Devices list, it is time to use SuperScan.
Another reason to use SuperScan is when the volume has been quick-formatted, or disk's surface has been heavily overwritten by other data, so you are not able to find your deleted data using QuickScan and Search procedures. SuperScan gives a chance to detect damaged file records as well as to reconstruct some known file types by signatures.
SuperScan processes the whole surface of the physical device searching for all possible logical drives (volumes) and partitions, whether they are existing, damaged or deleted. If a partition cannot be found, SuperScan keeps searching.
SuperScan reads each disk sector and looks for not only the boot sector, but also tries to reconstruct the drive structure, based on residual clues to the drive's system structures that remain on the disk surface. This is a slow process, however it usually gives much better results than QuickScan.
When SuperScan finds file data and the deleted or damaged file is not fragmented, the SuperScan can detect files by matching template patterns to the found data. These files collected to Signature Files folder and can be recovered from there. Usually such files do not have name, date stamp and other file record information.
To run SuperScan:
In the Local System Devices list, select a physical device, or a volume that contains your data. It may be a Fixed Disk, USB external or Removable Disk, Memory Card, and even Floppy and CD/DVD-ROM
To open the SuperScan Options dialog, do one of the following:
Click SuperScan toolbar button:
Right-click the disk and choose SuperScan... from the context menu
Press Ctrl+Enter key combination
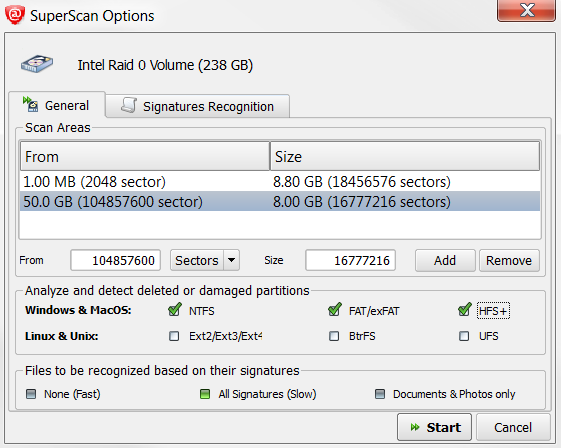
Fields From and Size contain currently selected object's geometry in sectors. You can switch geometry display to other units (Bytes, MB and GB) using drop down combo box. If you now click Start button - this area will be scanned by default
To select disk's area manually, type the starting sector number in the From field and the number of sectors in the Size field. If you need several areas to be scanned, define area parameters and click Add button, then type other area parameters and click Add again.
In the Analyze and detect deleted or damaged partitions area, select the check boxes next to the partition types that you want to look for. Clear the check boxes next to the partitions that you do not want to look for. If you select all partition types, the scanning takes a longer time, however you may find more recoverable partitions
If a disk has been severely damaged and partitions and files are not found, you may turn on the File types to be recognized based on signatures option. Provided that the files are not fragmented, Active@ Scan technology would detect the file signatures and would try to reconstruct files of certain types. The detected files, when this option is turned on, will be placed into the Signature Files virtual folder and will have abstract filenames (because no file header could be detected, only file data), however their content can be valid. You may try to recover your documents or images from the Signature Files virtual folder later on. The None option means that no signatures recognition will be applied, it will speed up the SuperScan process, and less memory (RAM) will be consumed. The All option instructs SuperScan to recognize all possible supported signatures. The Documents & Photos only option lets you choose the file types you want to recognize based on signatures (including user-defined signatures being loaded from template file) and recover them later on:
Click Start button or press Enter to start SuperScan process
The statistics and progress bar appear underneath the scanning area. To stop the SuperScan at anytime, click Pause red button at bottom, or choose Pause SuperScan from the context menu.
If SuperScan has been paused, you may resume it by clicking Resume button at bottom or by choosing Resume SuperScan from the context menu.
If you have saved paused SuperScan results, its state being saved as well, so you can resume SuperScan later on, after loading SuperScan results - even after re-boot, or on another machine having the same HDD/USB disk attached
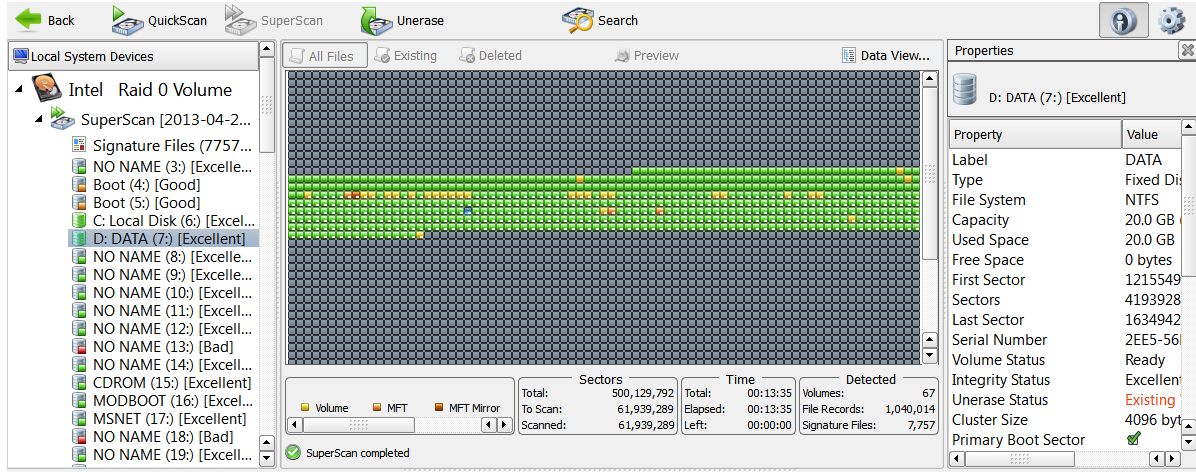
For each SuperScan process a new virtual folder named SuperScan [YYYY-MM-DD HH:MM:SS] has been added under particular disk being scanned. The contents of this folder displayed in the tree view as well as in the Data View (right panel). You may treat SuperScan virtual folder and its contents the same way that you treat other device nodes in the list. You may follow the same steps to scan found volumes, then search for files and folders to be recovered.
Inspecting SuperScan results
SuperScan can be a long process. You can check the estimated run time displayed on the status panel at bottom of the Scanning Area. You can wait until SuperScan finishes, or you can inspect and manage found partitions (volumes) "on-the-fly":
Click the volume in the tree (left panel) to highlight the volume position in the Scanning Area (right panel)
Right-click the volume and choose Properties from the context menu - to check volume integrity and attributes being detected
Double-click the volume, or choose QuickScan from the context menu - to scan the volume, browse its folders, view files and so on
You can preview and recover your files from the found volume while SuperScan is still in progress
After you have inspected the volume, if results are not satisfactory, you can hide the volume, by choosing Remove from the context menu
To unhide all volumes being removed previously from the list, choose Show All Volumes from SuperScan node context menu
Grey icon with Brown or Red box shows a deleted partition that can be recovered, however this partition might has been formatted before deletion or has some other damage
After you run a SuperScan, you may notice a tab named Signature Files. This virtual folder contains file data that was detected based on templates of commonly used file types (*.JPG, *.DOC, etc...). Files in this folder have been renamed because no file header was detected.
If the file data is un-fragmented, there is a good chance that SuperScan recovers the data in these files. If you haven't found your files during volumes inspection, try to recover similar file types from Signature Files folder. There could be a chance you find your data even if file record containing file name has been overwritten.
Important!
After you complete a SuperScan, you may find hundreds of partitions. Volumes having different locations and sizes, may have been created and then deleted at different times on the device being scanned. If you have virtual VMware workstation profiles (from VMware, Inc.) or VirtualPC profiles (from Microsoft Corp.), these files also contain partition information.
Moreover, if remains of damaged disk structures not enough to define all necessary partition parameters, SuperScan uses complex algorithms to project the most probable parameters and instead of one partition could create 10-20 partitions having different sizes, offsets, cluster size and so on.
This does not mean that SuperScan creates a lot of garbage. This means that among these projected partitions most likely will be the one you've lost, and most likely you'll be able to find and recover your data.
So, if you cannot find your data on the volumes having Excellent or Good recovery status, it is still recommended that you wait until SuperScan finishes and then inspect all found volumes once again.
Filtering SuperScan results
To reduce the amount of work, you may use a filter so that you are working with a smaller set of data. After the SuperScan, all detected volumes are displayed. When you change the settings in the filter dialog box, you can display only selected types of volumes.
To filter SuperScan results:
After running SuperScan, select the virtual folder with the name SuperScan [date time stamp]
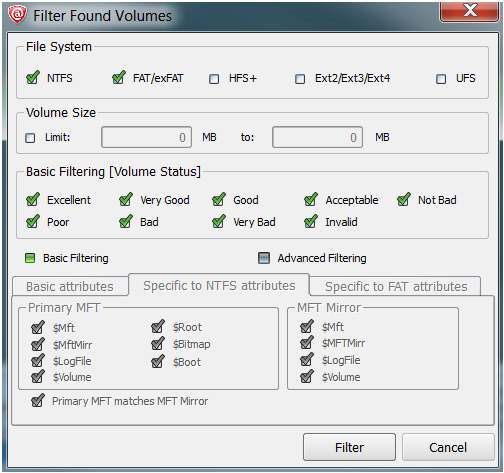
Right-click the node. From the context menu choose Filter... The Filter Found Volumes dialog box appears
To select the types of file systems to display, in the File Systems area, clear the check box beside the types that you do not want to display. Only the selected types of file systems data will be displayed
To display only those partitions within a specified size limit, in the Volume Size area, indicate the minimum and maximum sized partitions in MegaBytes. Only those partitions within the specified range will be displayed
To use basic filtering parameters, click Basic Filtering. To select displayed partitions based on partition status, in the Basic Filtering [Volume Status] area, clear the check box next to each partition status number that you do not want to display. Only the selected status ratings will be displayed
To use advanced filtering parameters, click Advanced Filtering and use the bottom section:
To restrict displayed results for found boot sector's attributes (file system-independent), in the Basic Attributes area, select the check box beside all the types of data that you want to display
To restrict displayed results for NTFS-specific parameters, in the Specific to NTFS attributes area, select the check box beside all the types of data that you want to display
To restrict displayed results for FAT-specific parameters, in the Specific to FAT attributes area, select the check box beside all the types of data that you want to display
Click Filter to set up a filter for all volumes found by SuperScan
To remove a Filter and show all found volumes, execute Remove Filtering context menu command on the particular SuperScan node.
Searching SuperScan results to find files and folders
If, as a result of your SuperScan you find a large number of partitions, you may want to use a Search to help you locate specific files or folders. You may apply Search for the particular volume, or for all volumes found. There are options in the search dialog box that allow you to make the search go faster. For example, you may want to restrict the search so that only deleted files and folders appear in the results, or restrict files by size. By choosing strict conditions, you may be able to locate a specific file or folder faster.
Storing and loading SuperScan results
Depending on the size of the drive that you are scanning, it can take a long time to scan partitions. On large or damaged drives, it can take hours. If you have to exit Active@ UNERASER for any reason, it would take a long time to scan the partition again. So that you don't lose the information that you have scanned, you may save the SuperScan results to a file. When you open Active@ UNERASER, opening the saved results file takes much less time.
If you decide to stop the SuperScan process, it is easy to continue scanning from the point that you stopped. After SuperScan has stopped, you may save the SuperScan virtual folder results, exit and re-start the application, open SuperScan results and resume SuperScan from the last point. To continue scanning, select the SuperScan virtual folder and click Resume button on the right of the progress bar.
To save SuperScan results:
In the Local System Devices list, select the SuperScan virtual folder and do one of the following:
Right-click the device node. From the context menu click Save Scan Results...
From the File menu, choose Save Scan Results...
In the Save Scan Results dialog box, type a path or browse to a folder where the scan results file is to be stored
Click Save
To open SuperScan results:
From the File menu click Open Scan Results...
In the Open Scan Results dialog box, browse to the file where you saved the scan results file
Click Open
In the Matched Devices dialog box confirm the device name (HDD/USB name) to apply SuperScan results for.
Important!
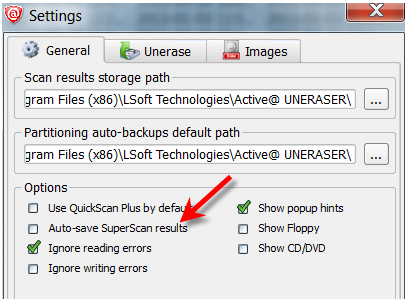
SuperScan results can be saved automatically. You can configure this option and storage path in General tab of product Settings.
Several devices might have the same name, for example, similar disks usually used in RAID arrays. In this case the order they appear in Matched Devices dialog matches the order devices appear in Local System Devices list. You may inspect your disks in Local System Devices list to know for sure which device to choose.