User Guide for Active@ UNERASER DOS:
5.1 Creating a Bootable Floppy Manually
A bootable floppy can be created manually in 2 steps:
- Prepare a bootable floppy disk or startup disk
- Copy UNERASER.EXE, DOS4GW.EXE files to the bootable floppy disk or startup disk in drive A:.
STEP 1: Preparing a bootable floppy disk or startup disk
Put a blank 3.5-inch floppy in the floppy drive (A:) and follow the appropriate instructions below for:
- MS-DOS, Command Prompt mode of Windows 95/98
- Windows 95/98/ME
- Windows XP
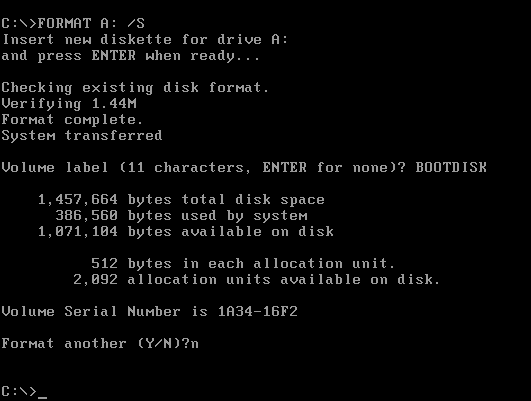
MS-DOS or Command Prompt mode of Windows 95/98:
- On the screen, type the format command as follows (see figure below):
FORMAT A: /S
- Follow on-screen messages until process is complete.
Windows 95/98/ME
- Click the Start button and click Settings, Control Panel
- From the Control Panel screen, click Add/Remove Programs
- In the Add/Remove Programs screen, click the Startup Disk tab
- Click the Startup Disk button and follow the screen instructions until the process is complete
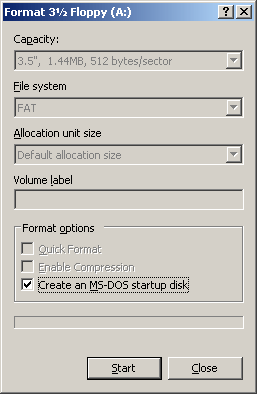
Windows XP
- Right-click A: drive.
- From the drop-down menu, click Format...
- Enable the checkbox beside Create a MS-DOS startup disk.
- Click the Start button and follow the screen instructions until the process is complete
If you have created a MS-DOS boot disk in Windows XP, you will have to delete some files to make some more room on the disk.
Delete the files:
EGA2.CPI, EGA3.CPI, EGA.CPI, KEYB.COM, KEYBOARD.SYS, KEYBRD2.SYS, KEYBRD3.SYS, KEYBRD4.SYS, MODE.COM, DISPLAY.SYS
That should free up enough space to fit both UNERASER.EXE and DOS4GW.EXE files.
STEP 2: Copying Active@ UNERASER, DOS4GW.EXE files
Copy the Active@ UNERASER file (UNERASER.EXE), DOS4GW.EXE file to the bootable floppy disk or startup disk in drive A:.
If you don't have the Active@ UNERASER file, Download it.
After copying the files onto the floppy disk, remove the floppy from the floppy drive.
Once preparation of the bootable 3.5-inch floppy disk is complete, you are ready to begin recovering data.